I wanted to paint the front door and garage doors of our home a while ago but couldn't decide on a color. I would normally go to red (because I always go to red) but the tan brick and cream / light yellow siding colors don't go with red. So I ended up choosing a grey-ish blue. I think it works well with the existing colors on the house; it brings out some of the darker tones in the bricks.
This is a pretty simple project, but made a big impact.
I also really want to get shutters up on the top level windows to tie it all together, but for now, the doors have all been painted.
Before:
I painted the door in one afternoon, and we painted the garage doors on a Saturday morning. We put a coat of grey tinted primer on and then 2 coats of the paint. Painting the garage doors surprisingly didn't take very long since we used a paint gun. The front door actually took longer because I rolled it on with a small paint roller and used a brush in the small places.
Here's the after:
... And as a bonus, you can see from the before and after pictures, our road in front of our house we fixed! It wasn't fun during the construction but it is soo nice now!
Can't wait to get some blue shutters put up!
Wednesday, October 23, 2013
Thursday, October 3, 2013
Wood Flooring- Light to Dark
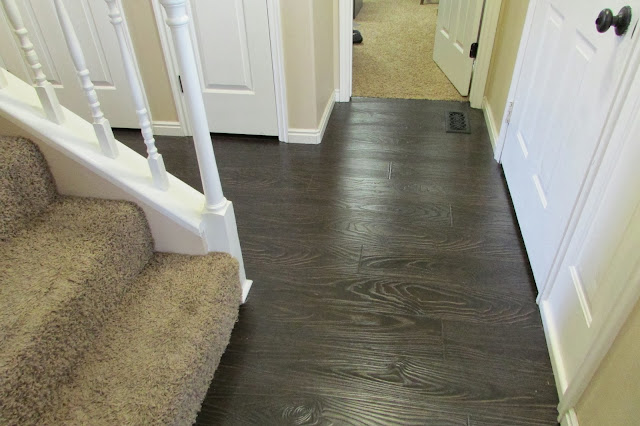
Back in April we finally put new flooring in downstairs! (Something I've been wanting to do since we moved in)
The whole project (400 sq. ft.) took about 5 days total, over the space of about 2 weeks and we had lots of help.
We looked all over the place for flooring and after going to all of the local flooring places, and didn't really find anything we liked, or it was way too expensive. So I ordered probably 20 different samples from online places. We narrowed it down to one- It was hand scraped and java color. It is engineered wood and we went with that option mostly because of budget but I love the way it turned out!
After the old flooring was removed, we put down some heavy black plastic to protect the new flooring.
After the plastic was put down the real work began -- as you can see from the pictures, there was a lot of people working on each part to get each piece locked in tight. All of the small spaces (especially closets) were extra hard because each piece had to be cut down to the right size, but still have the ability to lock in together. It was basically like putting a huge difficult puzzle together :)
The whole project (400 sq. ft.) took about 5 days total, over the space of about 2 weeks and we had lots of help.
We looked all over the place for flooring and after going to all of the local flooring places, and didn't really find anything we liked, or it was way too expensive. So I ordered probably 20 different samples from online places. We narrowed it down to one- It was hand scraped and java color. It is engineered wood and we went with that option mostly because of budget but I love the way it turned out!
AFTER |
BEFORE |
WAYYYY BEFORE.... BEFORE THE KITCHEN CABINETS WERE PAINTED |
BEFORE |
We ripped out all of the old flooring- that part of the job went quick. It took my husband and brother about an hour to clear it all out. We also took all of the trim off because the new flooring was a little taller than the old flooring.
We made a HUGE mess! |
After the plastic was put down the real work began -- as you can see from the pictures, there was a lot of people working on each part to get each piece locked in tight. All of the small spaces (especially closets) were extra hard because each piece had to be cut down to the right size, but still have the ability to lock in together. It was basically like putting a huge difficult puzzle together :)
After we got all the flooring on, we put all of the floor boards back on and admired the work all the boys did. It turned out great!
Here's the after pics:
Monday, September 9, 2013
DIY Plate Shelves
I've been wanting to do something in my dining room but I didn't know what. In the 3 years we've lived here, all we've done is put a table and a hutch in there, nothing on the walls. So I decided to make a plate wall originally. I got together some cool plates that I already had, and went to a couple thrift shops to get the other plates. Then I scattered them all over the dining room table, like so:
I started counting all of the plates and realized that I needed A TON of plate hangers. Well guess what, turns out they are kind of expensive. Like... they cost quite a bit more than what I got all of these plates for. So... I started looking at other less expensive options, and that's when I came up with making some plate shelves.
These shelves were really easy to make, the whole project took me about 4 hours total (With a little help from the husband).
I decided to make 3 shelves total. First I went to the store and picked up the following items:
3 - 2"x1"
6 - 2"x4"
Wood Glue
I already had nails, sand paper, white paint and paint brushes.
I used wood glue to glue 2 of the 2"x4"s and 1 of the 2"x1"s together (see picture)
I did this two more times to make a total of 3 shelves.
Then I reinforced the glue by pounding nails in every 6-8 inches down the shelf.
As you can see I am not a pro when it comes to trying to hammer a nail in straight..
After the shelves were put together, we put 2 coats of white paint on them.
They dried overnight, and then we hung them up in the dining room and I put all of my plates on.
I'm going to hang a few blue and white plates above this shelf but haven't gotten to that point quite yet.
Quick, easy, and inexpensive project! That's the kind I like!
Thursday, August 29, 2013
How I Painted My Kitchen Cabinets
One of the main things that our home needed the most was an update for the kitchen. We had the honey oak cabinets, old hardware, honey oak floor, and a huge ugly lighting box that dropped the ceiling a good 6 inches (at least). It also needs some new counter-tops but... that is a project for another time. The flooring has been changed (that will be the next post!)
So I decided to take on painting and antiquing the cabinets. Although it was a TON of work... I think it was worth it. I love how they turned out and it really brightened up our space.
Our cabinets were in really good condition, they were just... not my favorite color! Especially since the floors were the same color- see the before picture in all it's glory below: Can you see the awesome light fixture??
Then I took all of the hardware and cabinet doors off.
I lightly sanded everything- this is the part I got my hubby to help because I h.a.t.e. sanding. It actually really didn't take too long. We sanded about 30-60 sec. per cabinet door.
While sanding was getting finished up, I put plastic down and taped all around the cabinets- the ceiling, the floors, and any walls that were touching the cabinets. I ran out of good tape so I used this cream tape... Not a good idea! Just buy the good stuff! It's worth it :)
Can you see all of the sticky notes on each drawer and cabinet door? This is telling me where each one goes so it would all fit right and be easy when I went to put it back together (Which, at this point, was hours and days away). If you ever do this, I highly recommend labeling the doors and drawers. It helped for sure.
After the sanding was done, the painting began! I got paint with primer in it to save some work- I ended up putting 3 coats of antique white Behr paint on. In hindsight, I probably only really needed to do two but sometimes I can be a perfectionist and this was one of those times. Here's what it looked like when it was painted. I was really tempted to leave it white because it just looked so clean!
It's pretty easy to do- I just brushed it on with a foam brush (.30 cents at the hardware store) and then I went right behind with old t-shirts and wiped it all off. I had to be really careful that I wiped it all off the same so there's not streaks or parts that are way darker than other. Once you wipe it away you are left with a cool oldish look. To see what I mean- take a look:
With and without the glaze |
The antiquing part gave me a work out for sure, but it gave it character and I love how it turned out. After I antiqued it, I put a top clear coat to protect everything, added some new oil-rubbed bronze hardware, and it was done!!!! We worked on it on the weekends and nights after work and it ended up taking about 2 weeks.
Here's the finished product!!
Now fast forward to last April--we re-did our flooring and here's the kitchen now!
Subscribe to:
Posts (Atom)